Carpal tunnel exercises and ergonomics tips for carpal tunnel

If you can make these movements a habit, your wrist bones will move freely and reduce the pressure on your medial nerve.
Movement #1 – Circles
This movement will strengthen the wrist operating muscles and promote maximum flexibility of the carpal tunnel bone structure at the same time. If you only have the time/energy to follow one recommendation on this web site, perform this movement! It should be done whenever you think about your wrists, before you start on a long keyboard session, during a break from such a session, and during your morning exercises. Here is how to proceed:
1) While sitting down, place your feet about 18 inches apart and lean forward. Refer to Figure 3.
2) Place your forearms diagonally across your thighs and just above your knees such that your elbows are on the outside of your thighs and your hands are in front of your knees. Your hands should be about a foot apart.
3) Slowly rotate your hands with your palms always facing down. The rotation should be such that both hands are coming up as they come together in the middle. (Your right hand should rotate clockwise and your left hand should rotate counterclockwise). The tips of your fingers will draw a circle that is perpendicular to the floor. Your forearms must not rotate.

4) It is important to rotate your wrists through the full range of motion for each position, i.e., when your hands are to the outside your wrists should be bent as far to the outside as they can bend. In other words, your finger tips should be making as big a circle as possible.
5) Continue to make ten fairly slow circles. Taking about four seconds to make one rotation.
Movement #1 is not easy to perform correctly without practice. The biggest mistake people make is that they let their hand tip to one side or the other. DO NOT LET YOUR FOREARMS ROTATE. They should lie still upon your thighs. It is normal to feel some clicks and pops in your wrist and to experience some discomfort when you try to keep your palms facing straight down. This is due to the fact that you may be moving something that has not moved to this extent for a very long time – take it easy in the beginning.
Movement #2 – Stretching
Stretching relieves symptoms because the tendons tend to become thinner when they are regularly stretched. Isometric stretching has become the recommended technique for all stretching. This technique has gained popularity not only because it is very effective but also because you can see improved flexibility the first time you use it.
I recommend doing this stretch three times a day: just before the wrist exercise explained below, just before starting work after lunch, and before going to bed.
1) Assume the classic prayer position with your fingers straight and pointed up. Your elbows should be elevated and out from your sides such that your forearms combine to form one straight line in front of your chest.
2) Bring your hands to your chest until your thumbs are touching your chest. Slide your hands down your chest until you feel some tension.
3) Gently push your finger tips together isometrically for about 8 seconds.
4) After 8 seconds stop pushing and completely relax your hands and see if they will slide down a little further than before.
5) Repeat steps 3 and 4 two more times, relaxing your hands (while holding them in place) for 10 seconds between each isometric push.
If you have done the stretch correctly you will most likely see that you can now stretch further than when you started.
Stretching Visualization
Whenever I meet a new doctor and remember to ask about visualizations I am always met with a very positive response. Apparently visualizations have gained wide spread acceptance in the medical profession.
However, no doctor has ever recommended a visualization to me if I did not first bring up the subject. Too bad, because visualizations work. Their wide spread use is only being retarded by doctors who are reluctant to suggest unusual ideas due to fear of appearing too unconventional.
Visualizations allow you to get a message to the healing functions of your body. When you have an infection, your body knows to send antibodies but when your tendons are pinching nerves and giving you pain in other areas, it is not likely that your body knows what to do. It needs your direction. Just as the Yogis slow down their heart rate by communicating with the body’s involuntary functions, you can get a message to your body through visualizations.
Perform the following visualization when performing Movement #2 – Stretching.
1) Close your eyes and relax. Try to think only of the task at hand. If you find yourself thinking about other issues let them go and return to the visualization.
2) Keeping your eyes closed, look at your wrists as if you have X-ray vision.
3) Breathe deeply.
4) Picture the tendons in your wrist and imagine that they are getting longer and thinner as you stretch.
Ergonomics
Ergonomics, the science of arranging or designing things for efficient use by people, has been receiving growing attention as our health awareness increases. There is no place where ergonomics is more important than the work place. Improving your working ergonomics and avoiding repetition are the easiest ways to make yourself safe from CTS. A few changes can be very effective. Below are a few suggestions.
The Keyboard
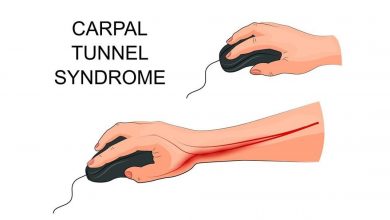
The most common cause of CTS is the repetitive action associated with keyboard use. However, the most repetitive strain experienced while using a keyboard is usually misunderstood. It is not the strain of pushing down on the keys. It is the strain of holding your fingers off of the keys. With each stroke of a finger, all your other nine fingers are being held up.
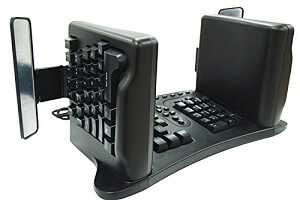
The perfect typing position is one where there is no tension needed to hold your fingers above the keys. The SafeType™ keyboard ($275) in the figure accomplishes this, but there is another way. Hold your hand out in space as if poised over a keyboard. Now relax your wrist completely and let your hands go limp. Your fingers should be now pointed down at a 45 degree angle. Actually, typing with your wrist bent down at 45 degrees can close the carpal tunnel and increase pressure. You will probably find that holding your hand up a few degrees to about 30 degrees is a good happy medium.
Now that you know the perfect position for typing, all you have to do is figure out how to get your wrists into that position. The solution actually brings with it some other advantages. However, many people still have resistance to this solution. The additional advantages are increased work space on your desk and less neck and back strain. So what is this wonderful solution?
Beg, borrow, or steal an office chair that has very adjustable arms. Put your keyboard on your lap and place your forearms on the arms of the chair. Adjust the arms of the chair fairly high and close to your body so that your wrists will be near a 30 degree angle. The usual problem with this solution is that most keyboards are too slippery and will slide around on your lap. Simply take some rubber cement and glue a piece of thick cloth to the bottom of your keyboard. (The rubber cement will allow you to remove the cloth without any residue).
When you first type with the keyboard on your lap it is likely that it will feel awkward. Stay with it! Do not reject this position because it doesn’t “feel good” at first. As you type this way you will notice that you have to make an effort to bend your wrist sideways in order to get to some of the keys. This is because your forearms are now held stationary by the arms of the chair. This sideways motion may seem like an effort, but this is exactly the crucial motion that you have been missing. After a while you will not notice the effort and will automatically be increasing the flexibility of your wrists.
Another important advantage of putting your keyboard on your lap is that your arms are now resting on the chair. The number one generator of neck tension at work is holding your arms poised over the keyboard. Try this: With your left arm resting on your desk place your right hand on the muscle that connects the side of your neck and your shoulder. Now raise your left hand off the desk as if it were poised over a keyboard. Feel the tension in that muscle? Hold both your arms like that for a half hour and you have muscle tension – guaranteed. That tension can spread down your back and up into your head. The results are: headache, fatigue, and backaches.
Some people do not want to put their keyboard on their lap because it moves their hands too far away from their mouse. You can have your cheese and eat it too. Get a trackball or a glide pad. Glue the trackball to your keyboard (if stronger glue is needed, silicon tub and tile glue comes off almost as easily as rubber cement, but is much stronger). You will not only have an effective mouse much closer to your hand than before, but also you will save even more desk space. If you want to make an investment in a new keyboard you will have no trouble finding one with a glide pad build right in.
Reading
Holding a book open, for a long time, uses the finger muscles and tendons in a cramped position while the wrist is held immobile. This is exactly the type of activity you need to avoid. It is easiest to avoid this by reading at a table with the book laying flat and your hands free to occasionally stretch. There are a couple of items you can make to help yourself.
The Page Weight
Now that you no longer have to hold up your book, you will need something to hold your book open. If you have a lot of tools or know someone who has a lot of tools, the next item will be very cheap – free. Find a worn out ten inch flat or half round file. This is a very common file size and nobody seems to throw out worn down files. Of course any long piece (about 10″ x 1″) of fairly thick metal will work.
1) Remove the handle, if it has one. This can usually be accomplished by locking the file in a vise, putting an old pair of pliers just above the handle and hitting the pliers with a hammer.
2) The two or three inch long extension that the handle was attached to can be left on but your weight will have a more appropriate shape if you cut or break it off.
3) At this point you have many options all of which should accomplish the same goal – the file should not be able to easily slide off the book:
Fast & Easy. Wrap a few rubber bands around the file. Short fat ones work the best.
Second class. Use the rubber bands to hold a piece of cloth around the ugly old file.
First class. Use contact cement to glue a piece of leather around the file. Cover the seam on the bottom with a 1″ wide strip of thin rubber.
When you are done you will be able to read with your hands completely free and rested. You will be surprised at how pleasant this feels.
The Reading Block
If you read without a table you will need to build something that will hold your book about five inches above your lap. What I use weighs about one ounce, took five minutes to make, and cost about $2. Here is how to make your own reading block.
1) Purchase a block of foam approximately 16″ x 6″ x 5″. Select a high density or fairly stiff foam so it maintains its shape well. There is a gray foam that is dense and looks more attractive than the white or yellow foam.
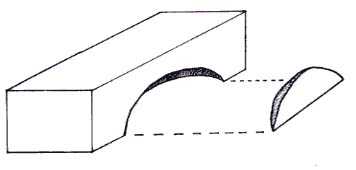
2) With a serrated knife, cut out a watermelon shaped wedge on the bottom edge that would be pressed up against your stomach. The bigger the stomach the bigger the wedge that should be cut out. You may also want to cut out a rectangle from the bottom of the block. Refer to Figure 2.
3) If you are handy with a needle and thread you can cover the block with an attractive fabric and have a simple, unique, inexpensive, hand made gift in a few minutes.
Strengthening
When your wrist controlling muscles are strong they will automatically take some of the work load off the finger controlling muscles and tendons. This may be sufficient to prevent your tendons from increasing their thickness once you resume strenuous activities.
Equipment
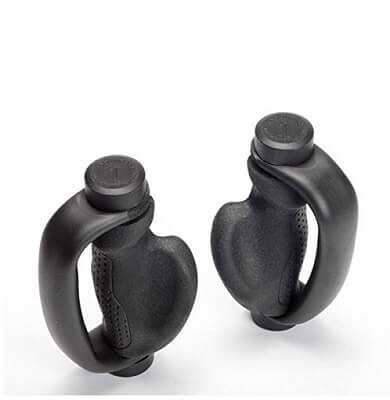
There are some popular dumbbells on the market that are perfect for this exercise – Heavy Hands ®, refer to Figure 4. These dumbbells have a bar that goes across the knuckles of your hand and allows you to open your hand palm down without dropping the dumbbell. This is good news for your toes. They are foam padded and very comfortable. I recommend the 5 pounders for people who weigh 130 pounds or more, the 3 pounders for smaller folks. If you are handy you can save some money and get a tighter fit by buying dumbbells with removable weights and following the directions below:
1) Remove the weights from the bar/handle.
2) Make a hole in one end of a 3/4 inch leather strap.
3) Slip the leather strap over one end of the dumbbell.
4) While holding the bar/handle, pull the strap over your knuckles and mark the end of the strap where the second hole should go to make a snug fit.
5) Cut the second hole and slip the strap over the end of the dumbbell.
6) Replace the weights.
One of the reasons why these exercises work so well is that they keep the bone structure flexible and at the same time they strengthen the wrist moving muscles. These muscles need to be strengthened so the wrist will perform its proper role in hand operations and take some of the load from the finger operating muscles. There are three exercises that have a very beneficial effect on wrist strength and flexibility. All are performed with the dumbbells and with your fingers held straight. They should be executed in the order they are presented here.
Wrist Strengthening Exercises #1
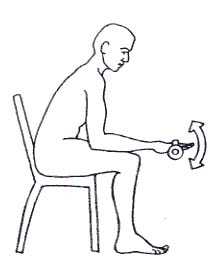
1) Sit down on the edge of a chair or couch with your knees spread wider that your shoulders (Same as Figure 5 except palms up).

2) Place your elbows on your thighs in the soft area just above your knees. Your forearms should be inside your knees. Your hands should be about 10 inches apart. Move your feet out enough to allow your wrists to be 2 inches lower than your elbows (slightly lower than Figure 6).
3) Hold the barbells palm up with the bar across your fingers (between the first and second joints counting from your palm). Keep your fingers straight.
4) Let the weight of the barbell stretch your wrist downward into the starting position and keep stretching this way for about 8 seconds.
5) Bending nothing but your wrist, slowly lift the barbell at the speed which makes the barbell feel the heaviest, stopping when your hand reaches the horizontal.
6) Slowly return to the starting position and allow your wrists to stretch out fully before your next lift.
7) Repeat until you feel a slight ache in your forearms, then lift 2 more times. With the 5 pounders the total should be 6 or 7 in the beginning, up to 10 or 12 after daily practice (add about 4 if using the 3 pounders).
Wrist Strengthening Exercises #2
1) Hold your arms straight up over your head and let your dumbbells slide down your fingers till they rest near your knuckles. Use your thumb to hold the dumbbells in this position. Keep your fingers straight.
2) By bending your elbows, move your hands as far behind your back as you can. Your elbows should be facing forward and your palms facing your ears. Refer to Figure 6.
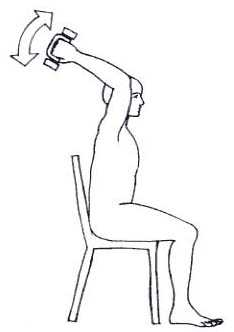
3) While keeping your forearms stationary, move the dumbbells up and down with your wrists. Remember to push hard at the top and bottom in order to achieve your full range of motion.
4) Repeat until you feel a slight ache in your forearms, then do 2 more lifts.
Wrist Strengthening Exercises #3
1) Assume the same position as Wrist Strengthening Exercises #1 except hold your hands palm down. Refer to Figure 7.
2) Bending nothing but your wrist, slowly lift the barbell at the speed which makes the barbell feel the heaviest. Lift them as high as you can to obtain the full range of motion.
3) Slowly return to the starting position.
4) Every three or four lifts quickly rotate your hands to a palm up position (the left counterclockwise, the right clockwise). Let the momentum of the dumbbell take your hands well past the palms up position – full range of this rotating motion.
5) Repeat until you feel a slight ache in your forearms, then do 2 more lifts and one more rotation.
You may experience a cracking sound from the rotation motion of Wrist Strengthening Exercises #3; this is a good indication that you are moving things that you usually do not. This will increase your range of motion and flexibility.
It is important to avoid using your gripping muscles during these exercises – they are getting too much work already, so keep your fingers straight. A little holding with your thumb is acceptable.
Other exercises. There is a carpal tunnel exercise that involves rotating a shaft that is held horizontally on a resistive wall mounting. This exercise does force the wrist muscles to work (similar to Wrist Strengthening Exercises #1), but makes the finger controlling muscles work also. Using the finger controlling muscles is what most people do too much of. I do not recommend this exercise.
Attention To Tendons !
If you have not experienced any relief after two weeks of performing Movement #1, Movement #2, and the wrist strengthening exercises, you should assume that increasing the strength of muscles, and the flexibility of the bone structure will not be sufficient. You will need to consider reducing the thickness of your tendons.
The way to reduce the thickness of your tendons is through atrophy. To accomplish this you must stop using your hand, except for Movement #1 and Movement #2, for at least three weeks. This may seem like a long time, but it can be much shorter and much less painful than the recovery from an operation. An effective addition to this approach is dieting especially for people who have a little excess weight. Those of you who diet from time to time, may notice that your fingers are among the first things to reduce in size. This seems to also be true of wrists.
It is almost impossible to avoid using your hand if you don’t wrap it. Put a 1″ x 1″ x 3″ piece of wood in your palm and wrap your fingers around it. This will prevent you from griping things through the bandage. I say bandage but the term muzzle would be a better description. It can be made of leather, vinyl, or an ace bandage. All that is necessary is that it makes it impossible for you to grip. Your wrist should be free to flex from side to side so you can perform Movement #1 often.
This may seem like an odd and troublesome approach but the result of the operation is much more troublesome and painful.
When you have atrophied your tendons back to their normal size you will have to be careful not to overdo strenuous activities. Continue to perform the Movement #1 and #2. Use power tools whenever you can and break up those long sessions of hand abuse. Be creative. I have resumed my windsurfing with excellent results but I realize that trouble is just around the corner if I do not perform Movement #1 and the exercises that have become a habit.
If you do have the operation you must know the truth – it can take 6 months before you can use your hand full strength without pain. It will be important to start moving your fingers and hand soon after the operation to keep the different layers from binding together with scar tissue – this will not be fun.